What is WordPress?
Contents
WordPress is a content management system (CMS) that allows users to create and manage websites with ease. It is an open-source software that powers over 30% of all websites on the internet. WordPress offers a range of features, including customizable themes and plugins, which make it easy for users to build and customize their website according to their specific needs.
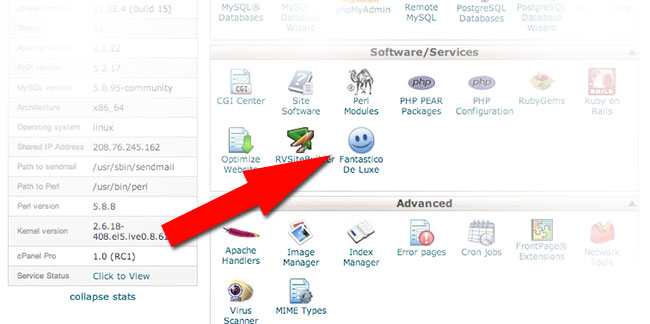
To install WordPress on your website, there are a few steps you need to follow. First, you need to choose a web hosting provider that supports WordPress installation. Many hosting providers also provides automated WordPress installer like Fantastico and Softaculous. Once you have signed up for hosting, you can then log into your control panel and click on the ‘Install WordPress’ button. This will take you through the installation process where you will be asked to enter some basic information about your website.
After completing the installation process, you can then log in to your new WordPress site and start customizing it by choosing a theme, installing plugins, creating pages and posts, adding images and videos, etc. With its user-friendly interface and powerful features, WordPress is an excellent choice for anyone looking to create a professional-looking website without any coding experience required.
Prerequisites for Installation
1. Before installing WordPress on your website, there are a few prerequisites that need to be met. Firstly, you will need to have a domain name and web hosting service set up. Your domain name should be unique and easy to remember, while your web hosting service should provide you with enough storage space and bandwidth for your website.
2. Secondly, you will need to ensure that your server meets the minimum requirements for running WordPress. These include PHP version 7 or greater, MySQL version 5.6 or greater or MariaDB version 10.1 or greater, and HTTPS support.
3. Finally, it is also recommended that you create a backup of your current website before installing WordPress to avoid any potential data loss in case of errors during installation. This can be done through various backup plugins available online.
By fulfilling these prerequisites before starting the installation process, you can ensure a smooth and hassle-free setup of WordPress on your website, allowing you to focus on creating engaging content for your audience instead of worrying about technical issues down the line.
Domain and Hosting Setup
The first step in setting up your website is to choose a domain name and web hosting provider. Your domain name should be memorable, easy to spell, and relevant to your brand or business. Once you have selected a domain name, you need to sign up with a web hosting provider. There are many different providers available, so it’s important to do your research and find one that meets your needs.
After registering for web hosting services, the next step is to install WordPress on your website. Most hosting providers offer an easy one-click installation process for WordPress. Alternatively, you can manually install WordPress by downloading the latest version from the official website and using an FTP client to upload it onto your server.
Once you have installed WordPress on your website, you can begin customizing it with themes and plugins. There are thousands of free and premium themes available that allow you to change the look and feel of your site. Additionally, there are countless plugins that add functionality such as contact forms, social media sharing buttons, SEO optimization tools, and more. With a little bit of time and effort invested in setting up your domain name, web hosting provider,and installing WordPress,you’ll be well on your way toward building a professional-looking website that will help you achieve success online.
Downloading WordPress Files
To download the WordPress files, you need to visit the official website of WordPress and click on the “Download” button. This will give you a ZIP file containing all the necessary files for installation. Once you have downloaded the file, unzip it and keep it ready for use.
Remember that before installing WordPress, you need to ensure that your web hosting provider meets its requirements. Some essential system requirements include PHP version 7 or greater, MySQL version 5.6 or greater OR MariaDB version 10.1 or greater, HTTPS support, and more.
In addition to this basic knowledge of downloading WordPress files and ensuring compatibility with your web host’s server is vital for a smooth installation process. Once installed correctly, you can start customizing your new WordPress site with themes and plugins to make it look exactly as desired!
Uploading to Server
Once you have downloaded the latest version of WordPress from the official website, it’s time to upload it to your server. There are different ways to do this, but one of the most common is using FTP (File Transfer Protocol). You will need an FTP client software such as FileZilla or Cyberduck and your hosting account credentials.
Open your FTP client and connect to your server using the host name, username, and password provided by your hosting company. Once connected, locate the public_html or www directory that corresponds to your domain name. This is where you want to upload all WordPress files and folders.
Create a new folder with a relevant name such as “WordPress” or “blog” if you plan on installing other applications in the future. Drag and drop all WordPress files into this folder. The process may take a few minutes depending on the size of the files and your internet speed. Once completed, you can proceed with setting up a database for WordPress installation through cPanel or another administration interface provided by your web host.
Accessing the Dashboard
Once you have successfully installed WordPress on your website, the next step is accessing the dashboard. To do this, simply add “/wp-admin” to the end of your website’s URL and hit enter. This will take you to the login page where you can enter your username and password.
Once you are logged in, you will be taken to the WordPress dashboard where you can manage all aspects of your website including adding new pages, creating blog posts, installing plugins and themes, and managing users. The dashboard is customizable so that you can organize it according to your needs and preferences.
It is important to note that as an administrator or editor of your site, only certain features within the dashboard will be available for use. Other users with lower level access may see a restricted version of the dashboard. Overall however, accessing and navigating through the WordPress dashboard is essential for effectively managing your website.
Activating Plugins & Themes
Once you have successfully installed WordPress on your website, the next step is to activate plugins and themes that will enhance the functionality and appearance of your site. To activate a plugin, simply go to the Plugins section on the dashboard, select the plugin you want to activate and click on “Activate”. It’s important to note that not all plugins are compatible with your WordPress version and theme, so be sure to read through reviews and check compatibility before installation.
Activating themes is just as easy. From the Appearance section in the dashboard, select Themes and choose from one of WordPress’s free themes or upload a premium theme. Once selected, click on “Activate” for it to become active. It’s crucial to choose a theme that aligns with your brand image while also being visually appealing, user-friendly and responsive across different devices.
Overall, activating plugins and themes is a simple process but requires some research beforehand. With thousands of options available, it’s important to only install what you need for optimal site performance without overwhelming visitors with too many features or complicated designs.


Recent Comments